distance learning

🔗 Book: Teaching Effectively with Zoom | by Dan Levy

Dan Levy has a book out called Teaching Effectively with Zoom.

Zoom is not my dominant teaching platform of choice, but this book looks really interesting, and likely has application for all video teaching. Click the link below for more information.

Home | Teaching Effectively with Zoom:

In this website, you will be able to: Find resources related to the book. Read short stories about how educators are using Zoom in interesting or innovative ways Submit your own stories to share with others about how you have been using Zoom to engage your students and help them learn

🔗 Google Meet now works with Chromecast on your TV

Google Meet now works with Chromecast on your TV. - 9to5Google:

Meet on Chromecast works exclusively through the Chrome browser on your desktop or laptop computer. That’s because, when this is running, Google still uses the camera, microphone, and audio from your machine to power the experience. The meeting itself is just cast off to your TV or other display so you can view it on a larger display. Google is continuing to be quite aggressive with updates to Google Meet.

While I am happy with my tech setup in my studio, I know there will be times when I need a change of scenery. I fully plan to teach some lessons from my sunroom and living room. My living room TV has a Chromecast built in and I can totally see myself projecting the class on to the big screen while providing feedback from my laptop on the couch and using the laptop screen as extra real estate for other apps.

Hyper-charging Online Classes with Open Broadcaster Software

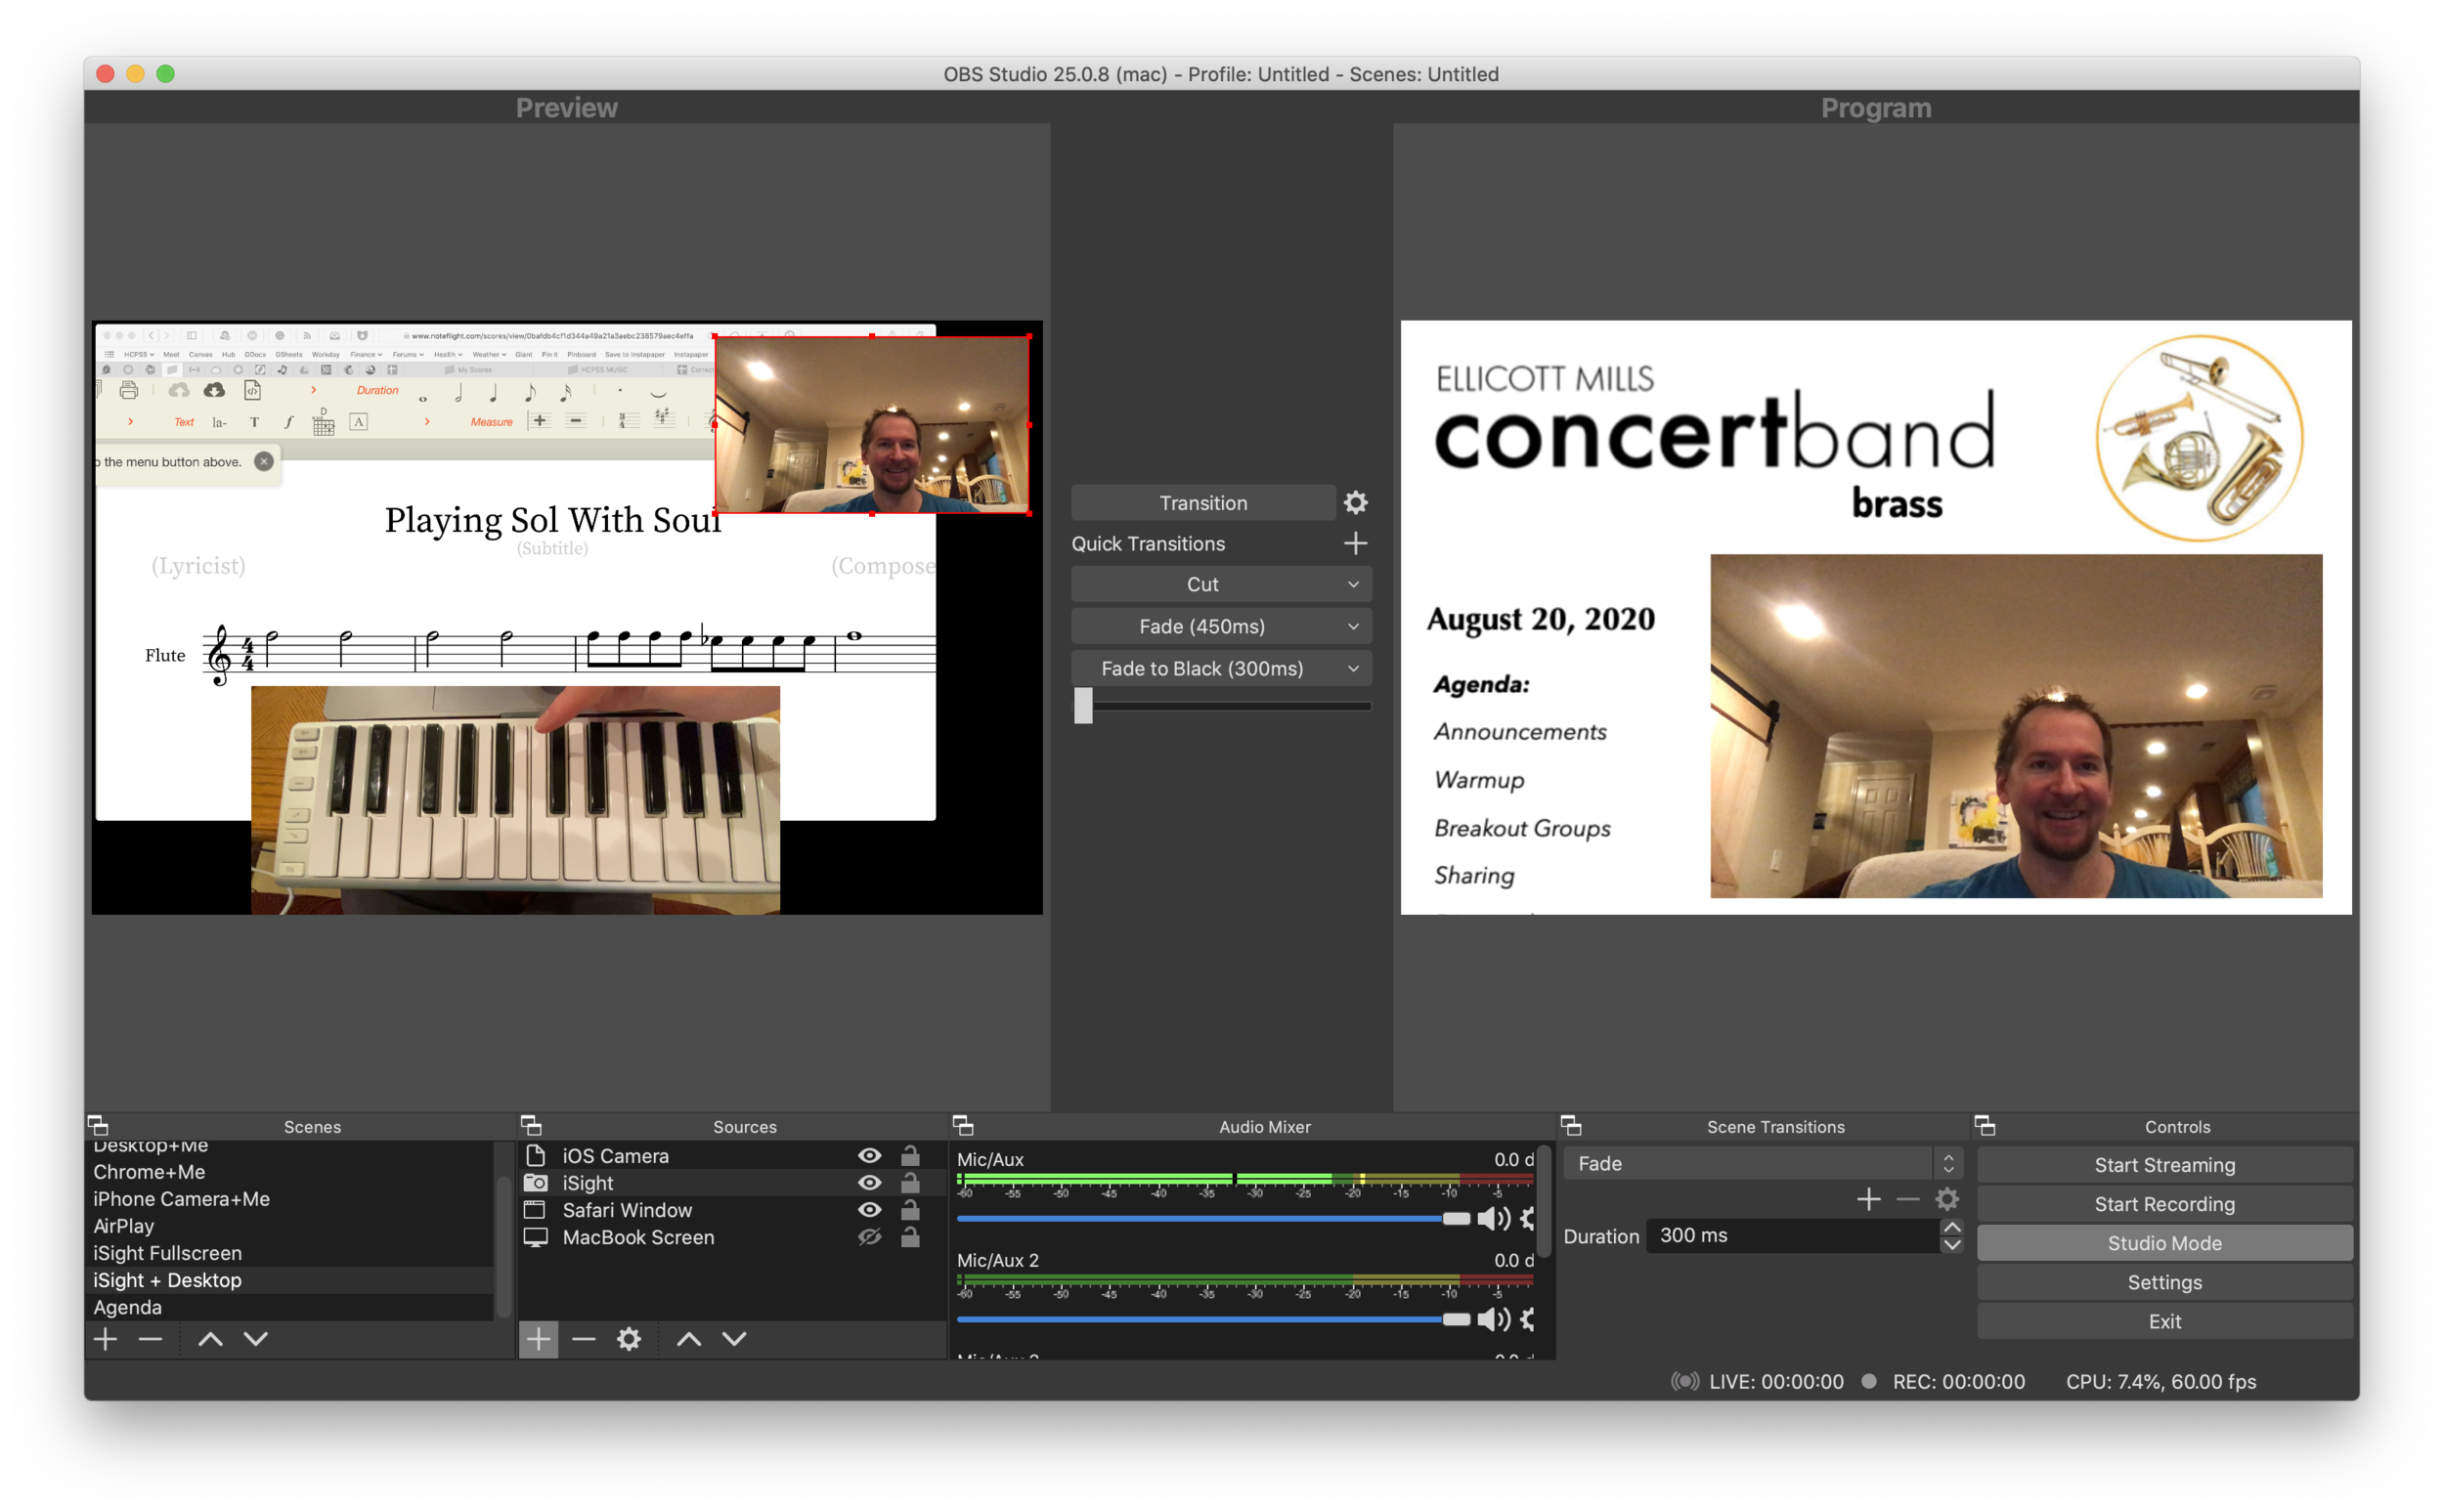
OBS allows me to combine multiple sources into engaging scenes that I can easily transition between. The right video represents the scene that is live for my students to see in Google Meet. The left represents the scene I have queued up to go live w…

OBS allows me to combine multiple sources into engaging scenes that I can easily transition between. The right video represents the scene that is live for my students to see in Google Meet. The left represents the scene I have queued up to go live when I press a transition button.

In an effort to embellish my online teaching setup, I have been experimenting with Open Broadcaster Software. It's free on Windows and Mac and honestly not that hard to set up. 

It links seamlessly to most streaming services and by installing this plugin, you can have the output of your broadcast be the input of your Google Meet, Zoom, or Microsoft Teams classroom. This pairs really well with my Loopback workflow, which has now become the basis for all audio input in my online classes.

The sources that can make up your scenes.

The sources that can make up your scenes.

OBS allows you to create scenes that combine different video sources, graphics, backgrounds, and microphones, and rapidly switch between them. You could have a scene that is just your web cam's view of your face talking or another one that combines a window of your web browser with your webcam's view of your face in the lower right corner. You could even have an image from your hard drive as a graphic in the upper corner of a scene, or as a static image or background. 

The video on the right represents the live broadcast, whether that be a Twitch Stream, Facebook Live, or your end of a video call. 

The video on the left represents a preview of whatever scene you currently have selected. Pressing the transition buttons in between the two videos makes whatever is on the left go live. 

The scenes and transitions can make your videos look very professional. I am all about this idea of making my classes feel like a Twitch live stream. This is the online video language that holds people, particularly young people’s, attention. Why not try to imitate it if it makes for more engaging music experiences?

So far some of my scenes include:

  • Webcam: this one projects my face fullscreen

  • Chrome+Me: displays a Chrome window with my webcam feed in the lower corner

  • Desktop+Me: same as above but shows my entire screen instead of a Chrome window

  • AirPlay: using AirServer (directions here), I can stream my iPad screen to a scene

  • iPhone Camera: you can use this app to use your phone as a second camera angle, or just use AirServer and stream your phone with the camera app turned on

  • Agenda: a static image that represents what would usually be on the board when students enter the room… It's what they will see when they are joining the Google Meet in the opening minutes of class

  • And many slight variations of the above

Scenes and the sources that they contain.

Scenes and the sources that they contain.

David MacDonald (recent podcast guest) has a great scene where he puts an image of a piano keyboard layout on the bottom of the screen, underneath the view of his webcam. The keys light up blue when he plays them so his music theory students can get a clear idea of what he is talking about. I recommend you check out a post of his if you want to learn how to do it. This post is also more instructive about the steps you need to take to get up and running with OBS and is a great starting point if you want go to this path. Read here: Teaching Tech (Live Keyboard Overlay in Zoom) .

live-keyboard-demo-2.gif

OBS makes transitioning between these scenes really quick and engaging to watch. It's fun to combine the different sources so that a student can see my screen, my face talking, and an overhead view of my hands on a keyboard all at once. But even the act of transitioning between those three sources smoothly is a big enhancement alone.

OBS has a super helpful community on Reddit and Discord. I didn’t need them that much though. Googling most of my questions yielded quick results from the OBS user forum.

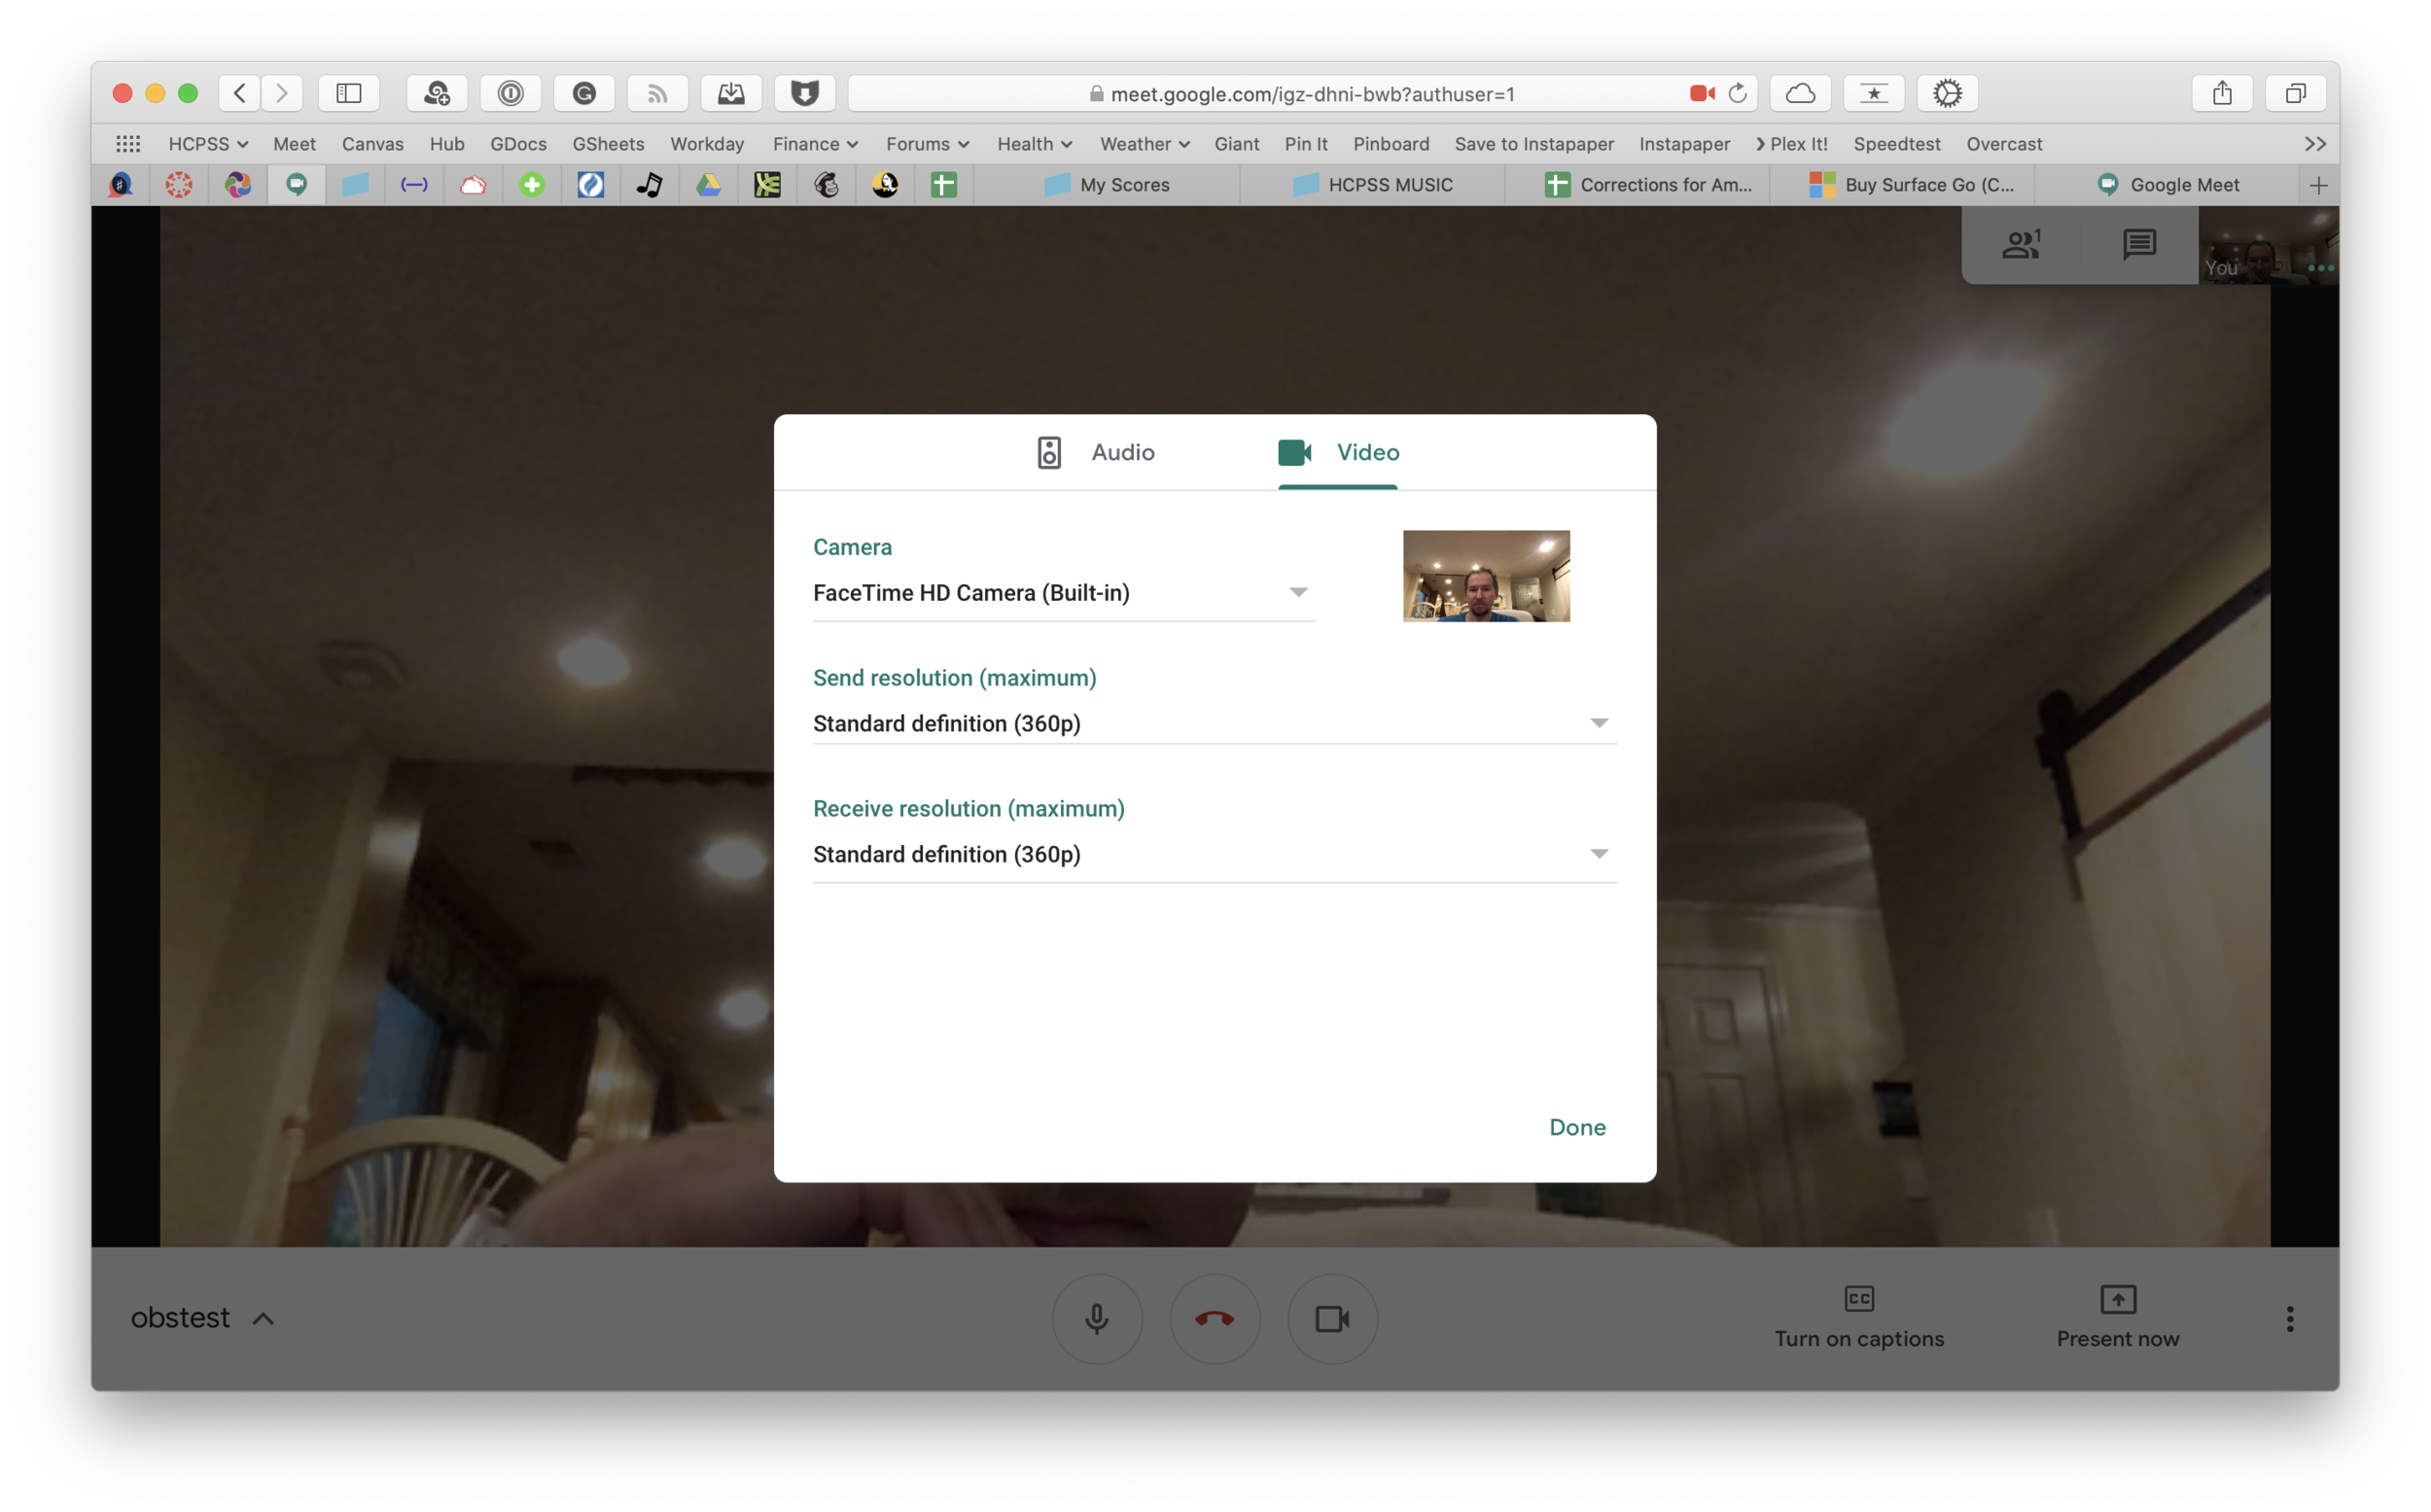
In Google Meet, Zoom, or Microsoft Teams, you can change the video source from your built in camera to the OBS virtual camera.

In Google Meet, Zoom, or Microsoft Teams, you can change the video source from your built in camera to the OBS virtual camera.

Edit: I have been using OBS and Keyboard Maestro in combination with the Elago Stream Deck and it is a dream! I hope to blog more about this device soon. See below for a demo of what I was able to get it to do in my first sitting.

Zoom Adding Advanced Audio for Professional Musicians

And music teachers everywhere rejoiced! New audio features coming from Zoom soon. Read the linked article below for more…

Teachers: Top Features for Securing Your Virtual Classrooms & Enhancing Students’ Learning Experiences:

Performing arts and music teachers — enjoy crystal-clear, professional-grade sound for your virtual lessons and performances. This option in Advanced Audio will enhance “Original Sound” mode, allowing you to disable echo cancellation and post-processing and get rid of compression. Not to get too into the weeds, but this setting will also raise audio codec quality from 22kHz to 48kHz, 96Kbps mono/192Kbps stereo for professional audio transmission in music education and performance applications. 

Note: This mode will require a professional audio interface, microphone, and headphones to allow you to offer high-quality private lessons. You will also be able to stream group performances from the same physical location — with higher-quality audio than most streaming platforms!

Look out for more information as we roll these features out through the end of August and September.

Routing Audio from Your Apps Directly Into Your Zoom Call (Or Other Voice Chat App) with Loopback

UPDATE: Learn more about Loopback from my interview with CEO Paul Kafasis on my podcast. Listen and subscribe below…

Loopback is an app that creates custom audio ins and outs for the Mac using the audio of other apps.

Loopback is an app that creates custom audio ins and outs for the Mac using the audio of other apps.

Have you been teaching a class in Google Meet or Zoom and wanted to play a song from iTunes for your digital classroom? Or perhaps a YouTube video or any other application with audio?

Sure, you can play it right on your computer and let the audio from your speakers go straight back into the microphone input of your computer. This works ok in my opinion. But it isn't going to produce a pure representation of the audio I am trying to send. And in some cases, it creates issues with echo, delay, or a nasty feedback loop.

So what do you do? Rogue Amoeba makes excellent Mac apps that, for lack of better explanation, hack into the audio system of your Mac. I have written about Audio Hijack here before, their app that allows you to record audio from other applications (and that's just the start of all the powerful things it can do). Rogue Amoeba also makes an excellent utility called Loopback.

What does Loopback do? Think about your computer's audio settings. You have an Input and an Output. The Input is, by default, your computer microphone, and the Output is the speakers. If you connect an audio interface that has higher quality microphone and speakers plugged in, you would need to set the Input and Output to that interface to get the input and out put the be the microphone and speakers, respectively.

Usually my computer microphone is a Device that can be set to the computer’s Input. In the scenario above, Loopback has allowed me to combine the audio from my microphone and the Music app into a new audio Device called “Music+Mic” that can be selec…

Usually my computer microphone is a Device that can be set to the computer’s Input. In the scenario above, Loopback has allowed me to combine the audio from my microphone and the Music app into a new audio Device called “Music+Mic” that can be selected as the input of my Mac or any individual app.

Your Inputs and Outputs can be controlled from the Sound settings of your computer. Some audio apps also let you control how, specifically, they behave. For example, I have manually set up GarageBand and Skype to use my audio interface as the Device I use for input so that whether I am recording for my podcast, or simply catching up with a relative, they hear me through the microphone, no matter what Device my Mac’s audio Output is set to in the System Preferences.

Loopback allows you to create Inputs and Outputs that are accessible to your Mac's Sound settings as well as your apps. In the example above, I have created an Input that combines my Mac's microphone (the usual Input) with the output of the Apple Music app, something I might want to use to play a recording example for my students in a Google Meet.

Selecting my new audio Device from the System Preferences.

Selecting my new audio Device from the System Preferences.

Look now as I go to my computer's Sound settings, and I can select this new custom Input to be used across the entire operating system! This way, when I am in a Google Meet, students are hearing both me speaking through the mic and all of the output of the Music app.

Now I can route my band warm up tracks, reference recordings, or any other audio I desire, into my Google Meet classrooms.

Now I can route my band warm up tracks, reference recordings, or any other audio I desire, into my Google Meet classrooms.

🔗 Choir Creator: All-in-One Virtual Ensemble Maker App, Shipping Next Month on iOS

New app for creating virtual ensembles coming next month. Click the link to read more information directly from the developer’s website and sign up to be notified when it is released.

Choir Creator: The All-in-One Virtual Choir Builder:

Choir Creator is the easiest way to organize and produce a virtual choir video. Releasing to the United States and Canada in August 2020 for iPhone and iPad running iOS 12.4 or later.

From the YouTube demo on the developer’s website, it looks like the workflow solves nearly all of the friction of this process. The business model of charging the teacher a considerable (but reasonable) amount of money and nothing to the student is solid.

That said, this process does not leave a lot of room for control. I would like to be able to, for example, turn up the tuba if it isn’t loud enough. I can think of numerous other ways that I would want to exercise more control than the output of this app would allow. That said, there is a strong market for software that makes it this easy. I think it may do well.

It’s iOS only at launch, which is not a surprise, but will limit school systems where students are using Chromebooks.

Edit: I have spoken with the developers of this app. They informed me that Choir Creator will support basic audio editing features at launch, like changing the volume and panning of each track. They said they have more audio editing features to come. Good to know!

🎙 #13 - Exploring Noteflight Learn, with John Mlynczak

John Mlynczak returns to the show to discuss Noteflight's new integration with Sound Check and offers advice to educators about teaching online this fall, and what we can learn from it.

Show Notes:

App of the Week: Robby - Kindle/Audible | John - TikTok

Album of the Week: Robby - Igor Levit - Beethoven Piano Sonatas | John - Hamilton on Disney+

Where to Find Us: Robby - Twitter | Blog | Book | John - Twitter

Subscribe to Music Ed Tech Talk:

Subscribe to the Blog

Subscribe to the Podcast in... Apple Podcasts | Overcast | Castro | Spotify | RSS

🎙 #12 - Making Music and Podcasts Using Soundtrap, with Meredith Allen

Subscribe to Music Ed Tech Talk:

Subscribe to the Blog

Subscribe to the Podcast in... Apple Podcasts | Overcast | Castro | Spotify | RSS

Meredith Allen, Sales Enablement Manager at Soundtrap, joins the show to talk about using Soundtrap in the music classroom to create music and podcasts, getting acquired by Spotify, and wearing hard pants.

Show Notes:

App of the Week: Robby - Permute Meredith - Innovators Compass

Album of the Week: Robby - Dreams Come True | Love Goes On Meredith - Rocketman Soundtrack

Where to Find Us: Robby - Twitter | Blog | Book Meredith - Twitter | Website

🎬 My Online Learning Welcome Video

Teachers in my district were tasked with making a welcome video introducing students to the first week of distance learning.

After denying several times that I would put any serious effort into this project, I inevitably got carried away and spiraled down a rabbit hole of apps, workflows, and tricks. Musicians and teachers are feeling a special kind of hunger right now to be creative. I am thankful for software and internet connected tools that help me to communicate in a unique way.

First, enjoy the video below:

The video was produced with the following software:


Apple Clips App

(Download here

Apple Clips App might be the only one of these apps you need. It is a free Apple app that is kind of like a cross between iMovie and Photo Booth. Its intended purpose is to make quick, engaging videos, designed to be shared in the age of Instagram Stories.

Clips is how I got my Memoji head to appear on my body. It will also automatically caption your video for you. It can bring in numerous effects, call outs, emoji, backdrops, and can even do still images of words. You could make a video that accomplishes the same general effects as mine in next to zero effort using only Clips. 

Clips allows you to integrate Animoji, Filters, Text, Stickers, and Emoji to your live video.

Clips allows you to integrate Animoji, Filters, Text, Stickers, and Emoji to your live video.

Clips automatically adds captions in a style you like. You can edit them after the fact.

Clips automatically adds captions in a style you like. You can edit them after the fact.

You can record yourself speaking over static posters to communicate information in an engaging way.

You can record yourself speaking over static posters to communicate information in an engaging way.

iMessage

iMessage is where I made my Memoji. It is also another place that you can get a Memoji head on top of your body (see screenshots below). I used this method for a few scenes in the video, instead of Clips, because it can shoot in landscape view. Clips produces square video only.

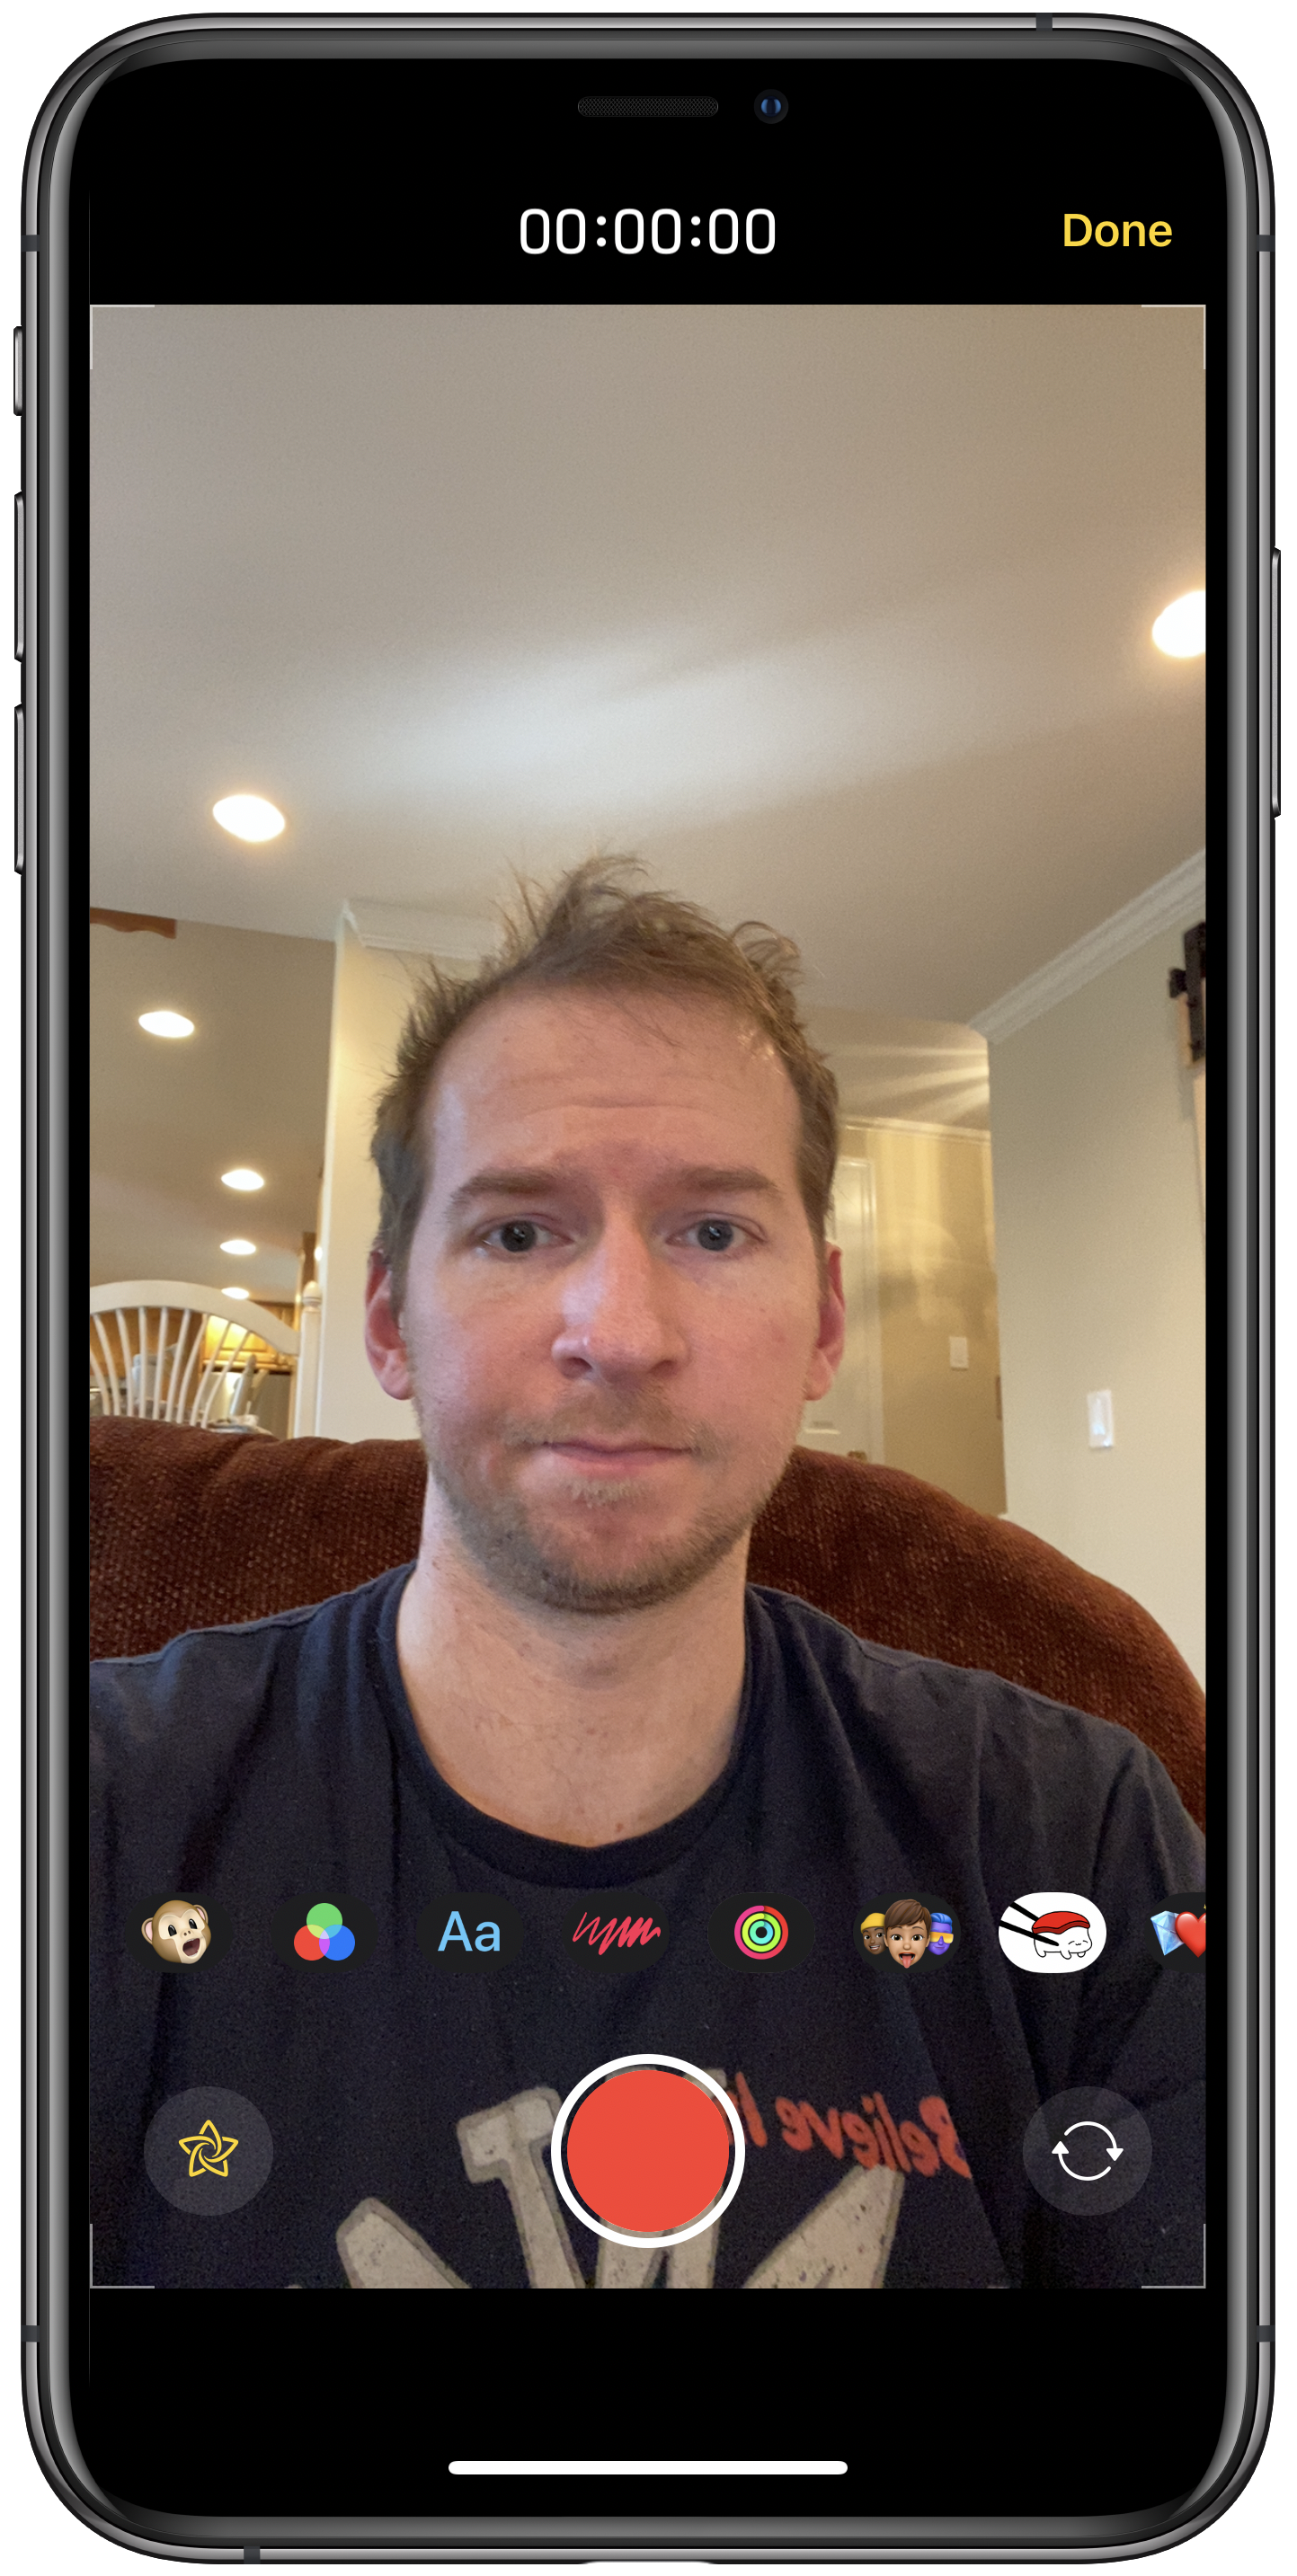
An alternate way to film yourself with a Memoji head is to open up a text message conversation to someone or yourself.

An alternate way to film yourself with a Memoji head is to open up a text message conversation to someone or yourself.

Select the camera icon right above the keyboard, and then tap the effect button in the lower left corner.

Select the camera icon right above the keyboard, and then tap the effect button in the lower left corner.

Next, select the Animoji icon, and then select your own Memoji.

Next, select the Animoji icon, and then select your own Memoji.

Final Cut Pro X

Final Cut is an industry standard video editor. It is currently free for 90 days. If you know iMovie and want to go deeper, this will be the easiest option for you. 

I used Final Cut to dump all of my audio, video, and photo assets, and to mix them all down into the final product. I didn’t use Final Cut to do anything iMovie can’t do except for the fancy moment where multiple videos show up on top of the main video at once (and it was very important to me that it do this).

Screen Shot 2020-04-11 at 4.55.30 PM.png

ScreenFlow 

(Download here)

ScreenFlow is like the iMovie of making screencasts. It can do fancy video automations and call out things happening on the screen (like mouse clicks, taps, type our whatever your keyboard is doing, etc…)

ScreenFlow’s editing tools are almost as easy as iMovie and it is so powerful, I probably could have probably made the entire video in it. There is a free version if you don’t mind a watermark on the final product.

Keynote

Keynote is what I used to make the nice slides with information. I used ScreenFlow to record my screen as I tabbed through the presentation in time along to an audio recording of my voice over.

Logic Pro

Apple’s premiere audio editing software. Free for 90 days right now. If you have used GarageBand, the basics of Logic will feel familiar to you. I used it to record some of the voice overs in the video but it is frankly unnecessary. I just wanted to use my nicer microphone and it happened to be plugged into the Mac I already use to edit audio in Logic.

Downie

(Download here)

Downie is how I downloaded some video and audio assets from the web to my Mac’s hard drive. 

Permute

(Download here)

This is a beautiful and fuss-free Mac app that converts video and audio from one file format to another.

Prompt Lite for iPad

(Download here)

This free teleprompter allows you to write a script and have it appear in large text on your iPad’s screen. It automatically paces through the words as you read them.

Others

I also used OmniOutliner to outline the original ideas, BBEdit to write the script, and YouTube to publish, but those are largely unnecessary. 

If this seems overwhelming, I assure you that you could make close to the same result in just iMovie or Apple Clips with next to zero effort. I have been locked inside for weeks and wanted to learn some of the skills required to polish up a video in Final Cut. I hope you enjoyed it.